Wednesday, February 14, 2018


The Birth of Modern Scrapbooking
This article is from Scrapbook.com
By the late 1990s, however, the standard scrapbook page size was shifting to a larger 12" x 12" square page that better accommodated 4” x 6” photos. Albums began to be available in a variety of types of bindings: strap hinge, post, and ring, to suit a growing community's growing needs. Some strap hinge albums still had paper pages similar to those of the early scrapbooks, but albums full of sheet protectors (to allow each page to have a different background paper) were increasingly becoming the scrapbook format of choice.
The first consumer digital camera was launched to the photography market in 1990. By 2006, Nikon and Canon had stopped development on new film cameras and had shifted all new camera production to entirely digital models. It had been barely over 15 years since the first digital camera was sold, and now film was going the way of the horse and buggy.
Digital photography eliminated a major barrier to taking pictures: cost.
With film, each click of the shutter had a price - first to purchase the film itself, and then to develop it. Although the price of film photography had decreased significantly over the course of the 20th century, as the technology aged and improved, costs could still easily run at least $10 for each roll used.
By contrast, a click of the digital shutter to take a photograph was free. Cost per image only became a factor when the photographer chose to print out an image. With this new freedom, photographers began clicking away, taking huge volumes of photos.
Creative Memories, Close to my Heart, and other home-based retailers of scrapbooking supplies were also very important to the growth of the hobby. Independent representatives for these companies held parties in their homes to teach friends and family members how to scrapbook, and sell the supplies needed in order to do so. Creative Memories, which was founded in 1987, became the largest home-based retailer and saw meteoric growth through the 1990s and early 2000s. Creative Memories representatives were both instrumental to the growth of the hobby and benefited from the rise in popularity at the same time. In 2004, at their peak, Creative Memories representatives drove over $400 million dollars in retail sales.

The first mobile camera phone was introduced in 2000, although it wasn’t until about 5 years later that camera phones gained enough traction, and quality, to be truly useful. With the development of quality smartphone cameras, personal photography was transformed again.
Like the Brownie had 100 years earlier, digital photography and the camera phone changed - not just how many photos we could take, but the type of photos that people took. The ubiquitous presence of our smartphones in our pockets or purses, at an arm's reach, meant that taking photos no longer required planning ahead or remembering to get out the camera and take it with us. Now, our camera is omnipresent. It's ready to use at a moment’s notice. We can and do use photography now to record the everyday minutiae of our lives, not just the big events. Now, we take pictures of our food, our pets, or the weather on a regular basis.
Between the removal of cost barriers, with digital photography, and the constant use of smartphone cameras, scrapbookers in the 21st century began to be flooded with photos. Having enough photos is no longer a problem. Many were now taking the volume of photos in a month that they had previously taken in a year with film.
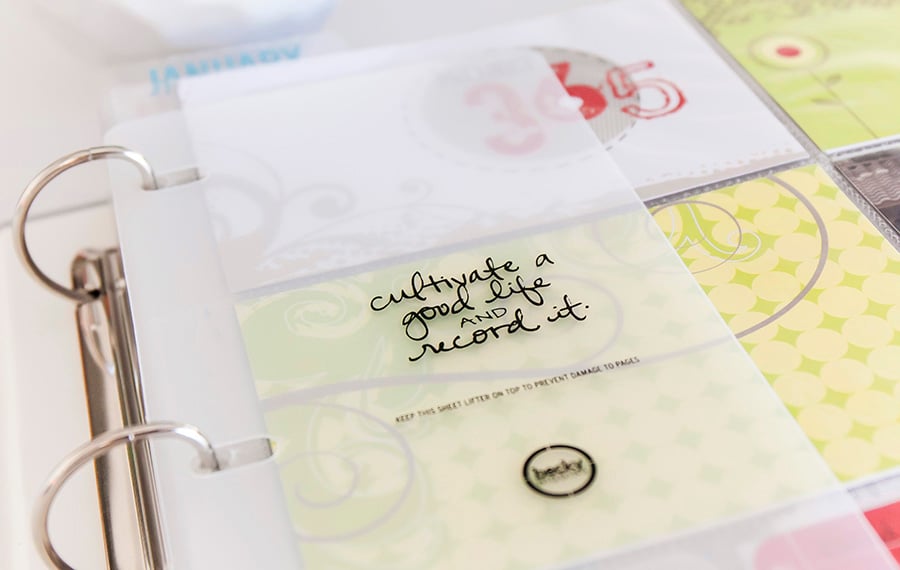
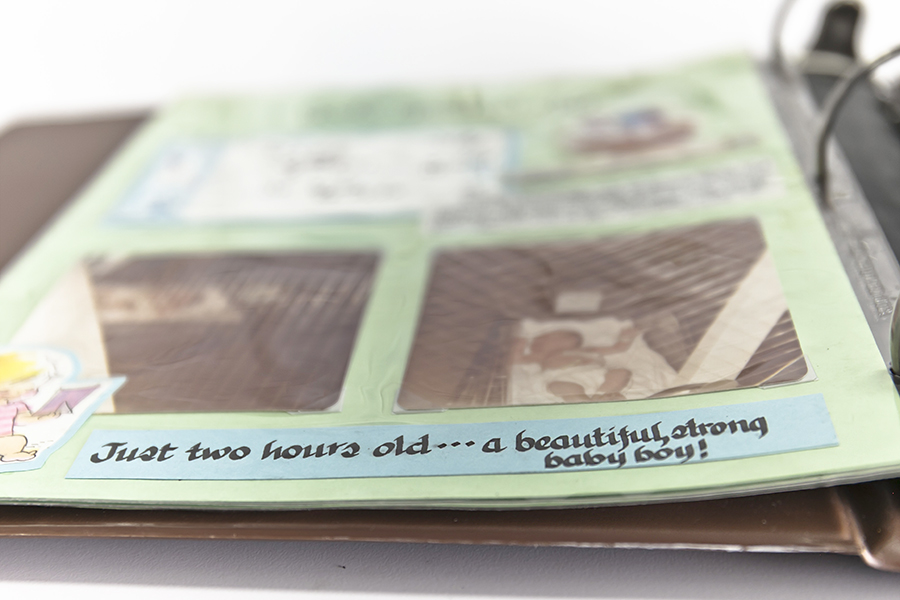
In late 2009, Becky Higgins left Creating Keepsakes and launched her own company to introduce the Project Life system. Project Life followed in the footsteps of Project 365 by offering kits of decorative cards that could be placed alongside photos in pocket-style plastic protectors. For scrapbookers, Project Life helped answer the question of what to do with all of the new “everyday life” photos they were accumulating. It also simplified the scrapbooking process and lowered the barrier to entry for new scrapbookers. Project Life appealed to those who may have felt overwhelmed by scrapbooking and also became an entry point for people who had never scrapbooked before.
While the technology and techniques may have changed over the centuries, one thing has remained the same – the human urge to record our history and tell our stories. Whether you call it a commonplace book, a grangerized book, a photo album or a scrapbook, one thing is for certain - scrapbooking leaves a legacy for future generations through beautiful, meaningful, handmade self-expression.
The Birth of Modern Scrapbooking
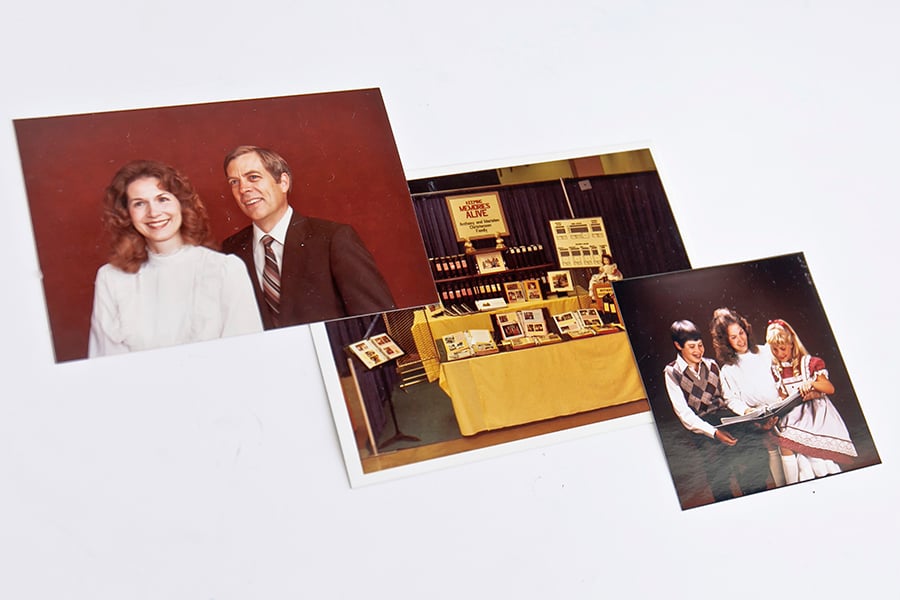
If you had to pinpoint exactly where today's form of scrapbooking originated, the birth of modern scrapbooking is generally accepted to have occurred in 1980 at a genealogy event called The World Conference on Records. Marielen Christensen was invited to the Church of Jesus Christ of Latter-Day Saints event in Salt Lake City to display her 3-ring binder albums (50 of them!) full of decorated scrapbook pages that she had begun creating a few years earlier. Christensen used archival-safe materials and put her scrapbook pages in clear page protectors - something done for the first time. She also introduced a unique photo and record-keeping system. The concept resonated with Mormon church members, whose faith values family and genealogy research.
From left
to right: Photograph of Marielen Christensen and her husband AJ in 1979.
The Keeping Memories Alive booth at the World Conference of Records.
Marielen looking at a scrapbook with two of her children.
In 1981, Christensen opened the first store devoted to scrapbooking called
Keeping Memories Alive. The store, located in Spanish Fork, Utah,
became a destination for scrapbookers. Scrapbookers from around the
country would travel to Utah to visit the Keeping Memories Alive store.
Soon after, the Christensens also started a mail-order catalog for those
who could not make the trip.Note: Jill Davis, Scrapbook.com Founder, was inspired by Marielen's ideas and innovations. She made several trips to the Keeping Memories Alive store in Spanish Fork, Utah, in the early 1980s to purchase scrapbooking supplies.
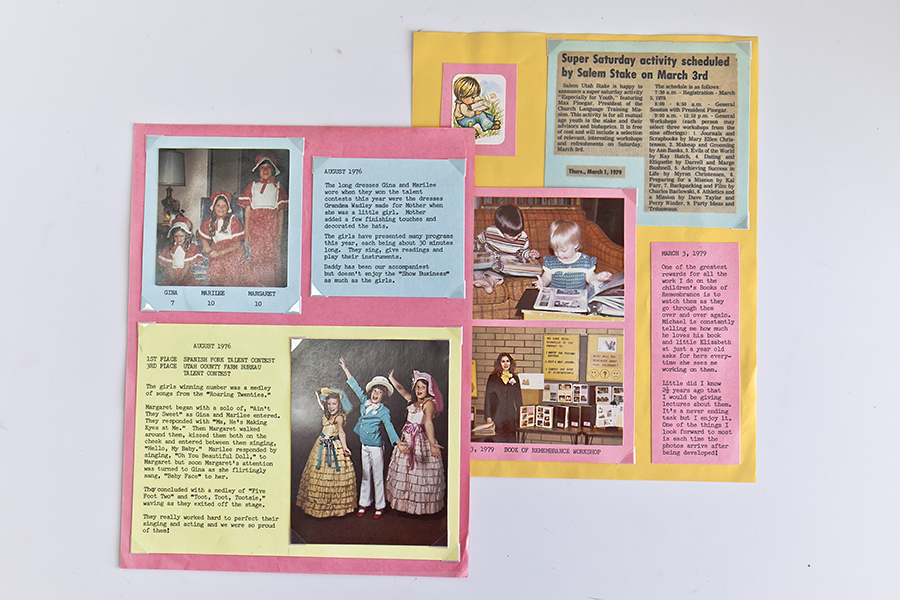
Two of Marielen Christensen's original scrapbook pages. One from 1976 and the other from 1979.
A close-up
of one of Christensen's early scrapbook pages in a clear protective
page protector. Christensen was the first to utilize page protectors to
protect and store her scrapbook pages. This was a key advancement in
modern scrapbooking.
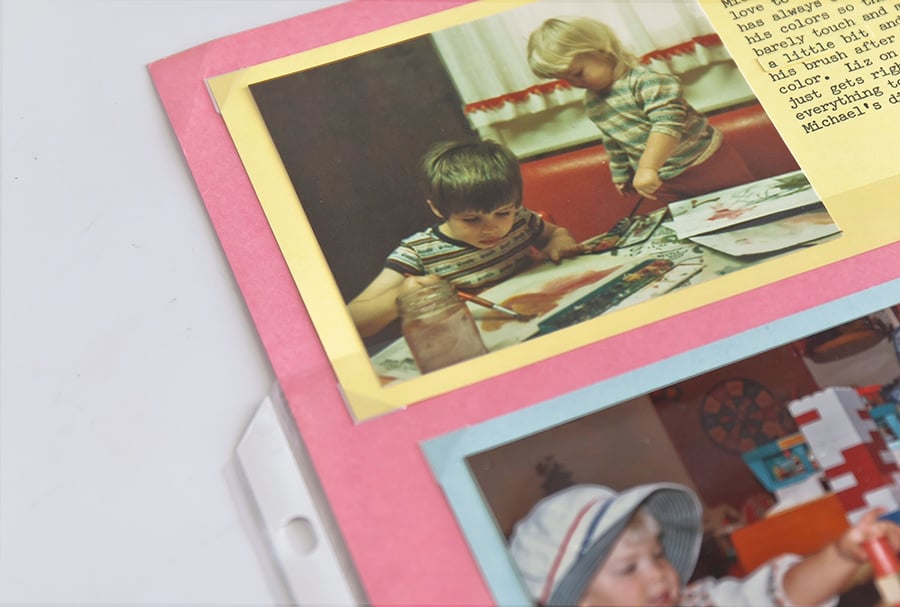
Christensen’s original scrapbook pages were, by necessity, on 8 ½" x
11" letter sized paper. She stored the pages in clear plastic sheet
protectors inside three ring binders. This innovative use of page
protectors was a key shift in scrapbooking for many reasons. Clear page
protectors helped protect photos and pages from damage, but they also
paved the way for a new era of page-by-page creation. The original,
Keeping Memories Alive scrapbooking papers were also 8 1/2" x 11", and
many of them were adapted from stationery designs.By the late 1990s, however, the standard scrapbook page size was shifting to a larger 12" x 12" square page that better accommodated 4” x 6” photos. Albums began to be available in a variety of types of bindings: strap hinge, post, and ring, to suit a growing community's growing needs. Some strap hinge albums still had paper pages similar to those of the early scrapbooks, but albums full of sheet protectors (to allow each page to have a different background paper) were increasingly becoming the scrapbook format of choice.
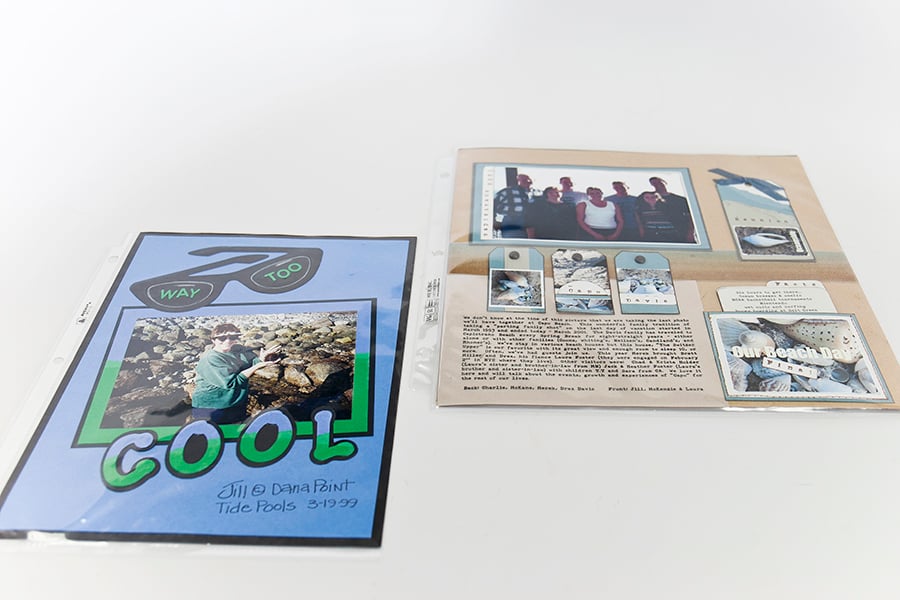
An 8 1/2" x
11" page on the left (from 1999) before the transition and a 12" x 12"
page on the right (from 2002) after the transition to larger pages. Both
pages were created by Jill Davis - Scrapbook.com Founder.
Digital Cameras
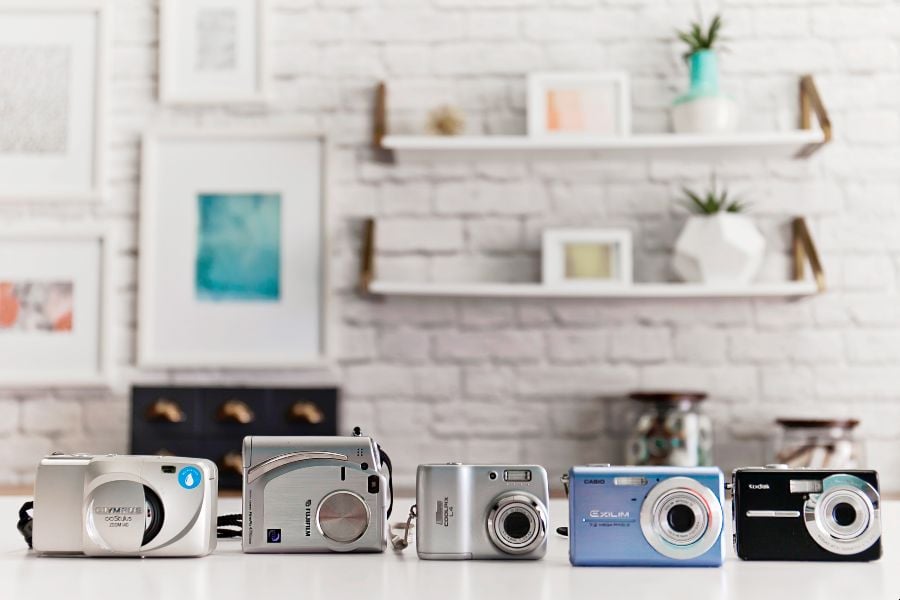
Around the time that color film was just becoming the standard for personal photography, the first digital camera had already been invented. Kodak engineer, Steve Sasson, developed the first digital camera, a prototype, in 1975. However, it would be a few more decades before digital photography became common (and affordable) consumer technology. And when it did, its takeover of the photography world was rapid.The first consumer digital camera was launched to the photography market in 1990. By 2006, Nikon and Canon had stopped development on new film cameras and had shifted all new camera production to entirely digital models. It had been barely over 15 years since the first digital camera was sold, and now film was going the way of the horse and buggy.
Different types and models of Digital Cameras from the mid-1990s to the mid-2000s.
With film, each click of the shutter had a price - first to purchase the film itself, and then to develop it. Although the price of film photography had decreased significantly over the course of the 20th century, as the technology aged and improved, costs could still easily run at least $10 for each roll used.
By contrast, a click of the digital shutter to take a photograph was free. Cost per image only became a factor when the photographer chose to print out an image. With this new freedom, photographers began clicking away, taking huge volumes of photos.
The Advent of Local Scrapbook Stores
By the late 1990s, several local scrapbook stores had popped up around the country. These stores provided a large selection of scrapbook albums, papers, and other products. The Local Scrapbook Store phenomenon continued into the 2000s. These early local scrapbook stores were a response to the booming interest in scrapbooking, but there were also instrumental in helping spread awareness of scrapbooking and enthusiasm for it.Learning to Scrapbook
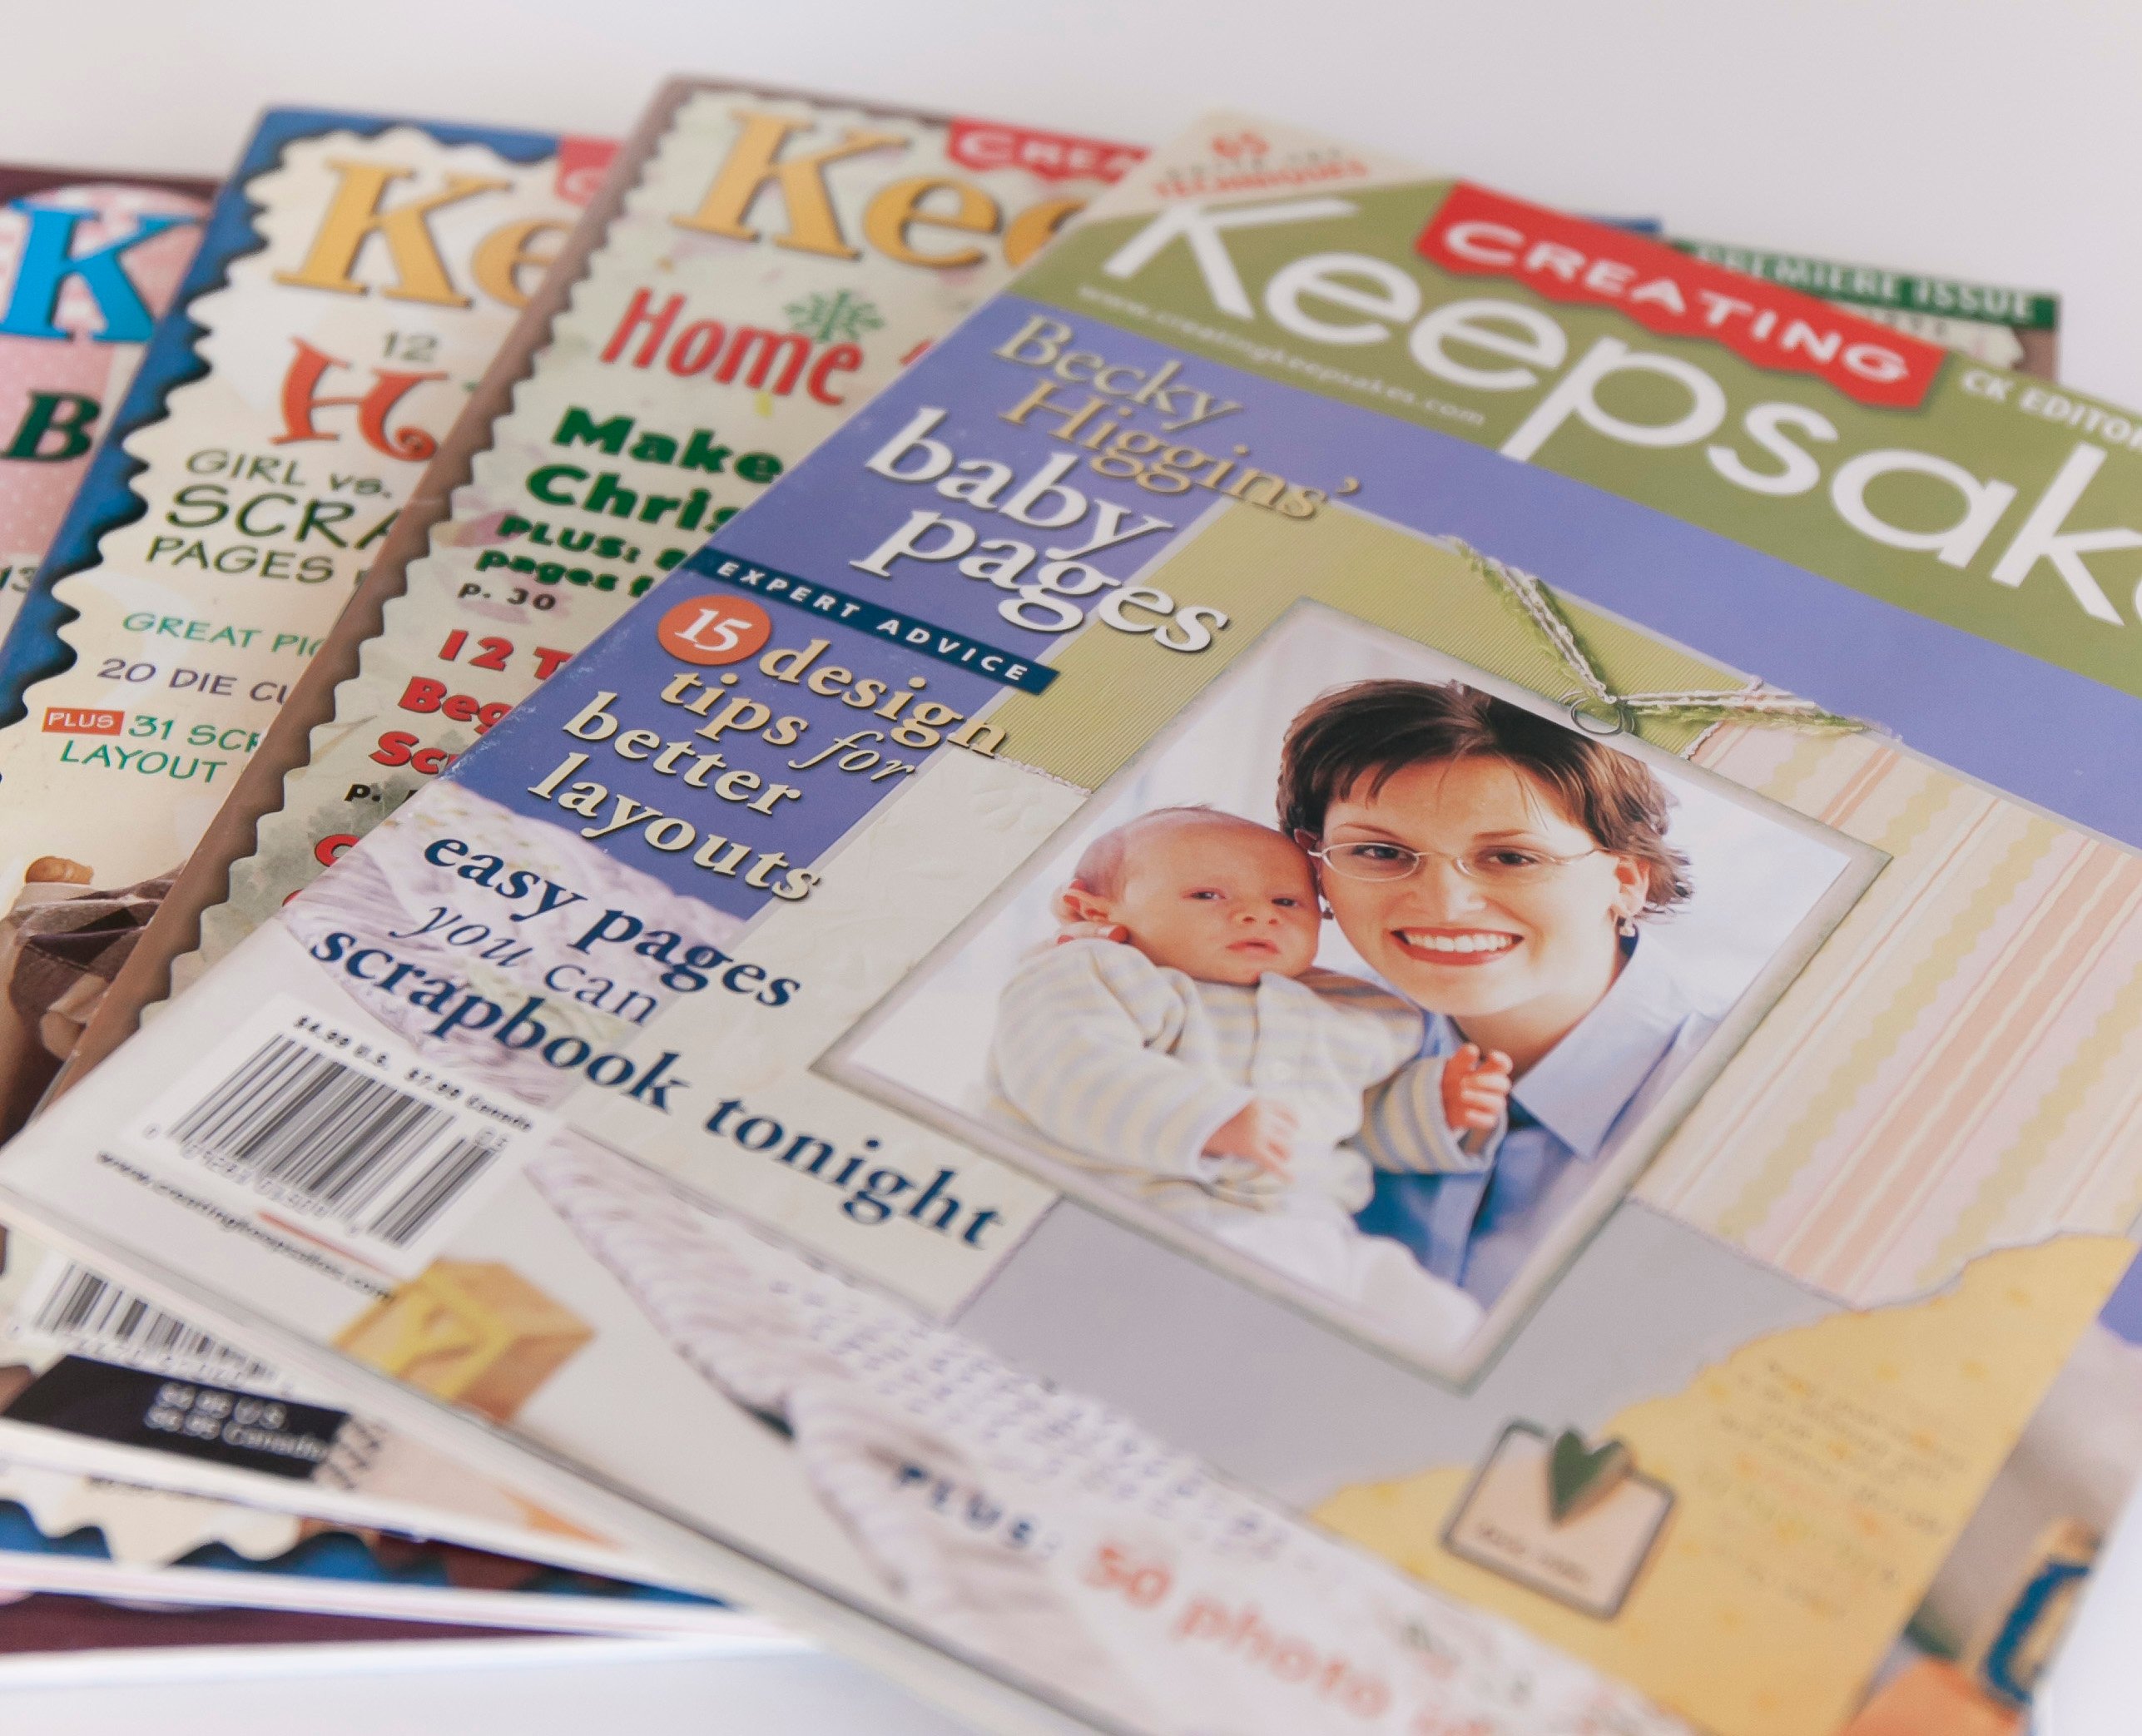
The 1990s also brought the inception of several scrapbooking magazines. Creating Keepsakes, Memory Makers and others saw meteoric growth during the second half of the 1990s and early 2000s. These magazines taught people across the globe how to scrapbook and they were also instrumental in spreading awareness and interest in the booming hobby. By the late 1990s scrapbooking magazines could be found on magazine stands of chain bookstores and retail stores across the United States.
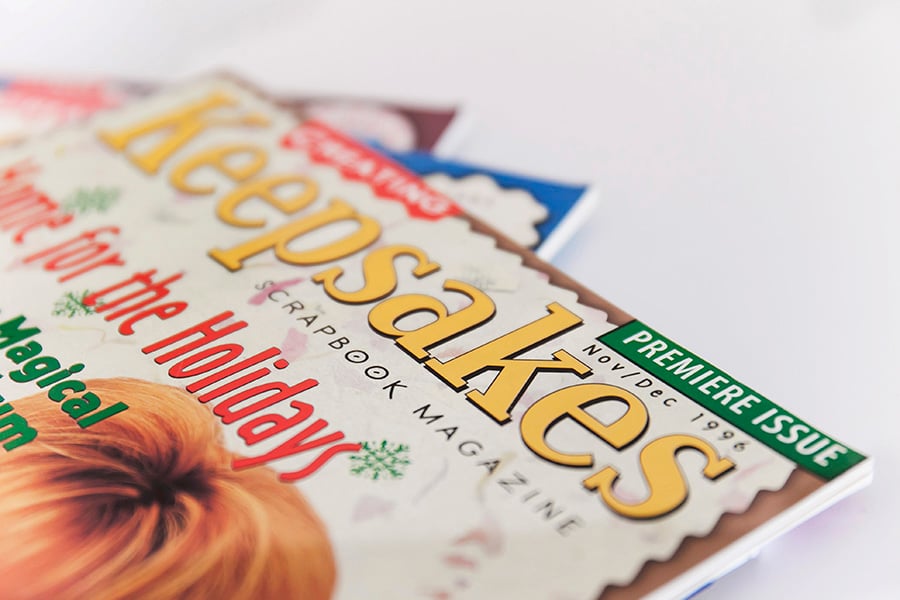
The first issue of Creating Keepsakes magazine published November 1996.
Several early issues of Creating Keepsakes magazine from the mid-1990s.
During the 1990s scrapbookers also began gathering at events called
"crops" where they could share supplies and teach each other new
techniques. These social scrapbooking gatherings, which still happen
today, are similar to quilting gatherings called quilting bee's that were popularized early in the 20th century.Creative Memories, Close to my Heart, and other home-based retailers of scrapbooking supplies were also very important to the growth of the hobby. Independent representatives for these companies held parties in their homes to teach friends and family members how to scrapbook, and sell the supplies needed in order to do so. Creative Memories, which was founded in 1987, became the largest home-based retailer and saw meteoric growth through the 1990s and early 2000s. Creative Memories representatives were both instrumental to the growth of the hobby and benefited from the rise in popularity at the same time. In 2004, at their peak, Creative Memories representatives drove over $400 million dollars in retail sales.
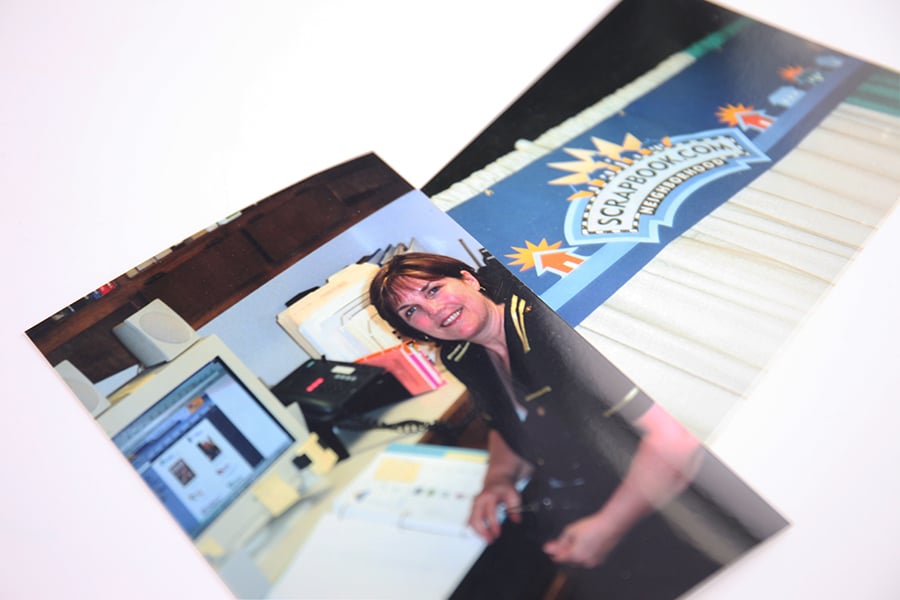
A photograph of Jill Davis on the day Scrapbook.com was launched in 1999.
Jill Davis, an artist and calligrapher, was one of the earliest
pioneers in the modern scrapbooking movement. She had been inspired
by Marielen Christensen in the early 1980s and started creating her own
scrapbooks and developing her own unique scrapbooking techniques and
ideas soon after. By the late 1990s, she was teaching sold-out scrapbook
classes in Arizona. Davis wanted to share her ideas and love for
scrapbooking to a larger audience. In 2000, she and her husband Charlie
launched Scrapbook.com, a place where Jill, and others, could teach the world how to scrapbook.
One of
Jill Davis' earliest scrapbooks. Jill's early style was inspired by
Marielen's scrapbooks and Jill also used clear page protectors as well,
based on Christensen's system.
An 8 1/2" x
11" scrapbook page created in the early 1980s. Jill used calligraphy
writing style for her captions and journaling on her pages.
One of
Jill's early scrapbooks. This photo showcases current Scrapbook.com CEO,
Drex Davis, on the left (Age 5) and current Scrapbook.com President,
McKane Davis (Age 3).
Later, Scrapbook.com created an online project gallery where people
across the globe could take photos or scans of their creations and
upload them in one place online to share. Soon, scrapbookers everywhere were teaching and inspiring each other in a way that seemed unimaginable just a few years earlier.Note: During the early 2000s several additional sites like Two Peas in a Bucket, Scrapjazz, DMarie, and a variety of other sites were also instrumental in connecting scrapbookers across the globe and helping to spread knowledge about the craft.
Smartphone Cameras
Now, our camera is omnipresent. It's ready to use at a moment’s notice. We can and do use photography now to record the everyday minutiae of our lives...
The advent of digital photography was a revolution in itself for
scrapbooking, but when digital cameras were added to smartphones, it
caused a second revolution.The first mobile camera phone was introduced in 2000, although it wasn’t until about 5 years later that camera phones gained enough traction, and quality, to be truly useful. With the development of quality smartphone cameras, personal photography was transformed again.
Like the Brownie had 100 years earlier, digital photography and the camera phone changed - not just how many photos we could take, but the type of photos that people took. The ubiquitous presence of our smartphones in our pockets or purses, at an arm's reach, meant that taking photos no longer required planning ahead or remembering to get out the camera and take it with us. Now, our camera is omnipresent. It's ready to use at a moment’s notice. We can and do use photography now to record the everyday minutiae of our lives, not just the big events. Now, we take pictures of our food, our pets, or the weather on a regular basis.
Between the removal of cost barriers, with digital photography, and the constant use of smartphone cameras, scrapbookers in the 21st century began to be flooded with photos. Having enough photos is no longer a problem. Many were now taking the volume of photos in a month that they had previously taken in a year with film.
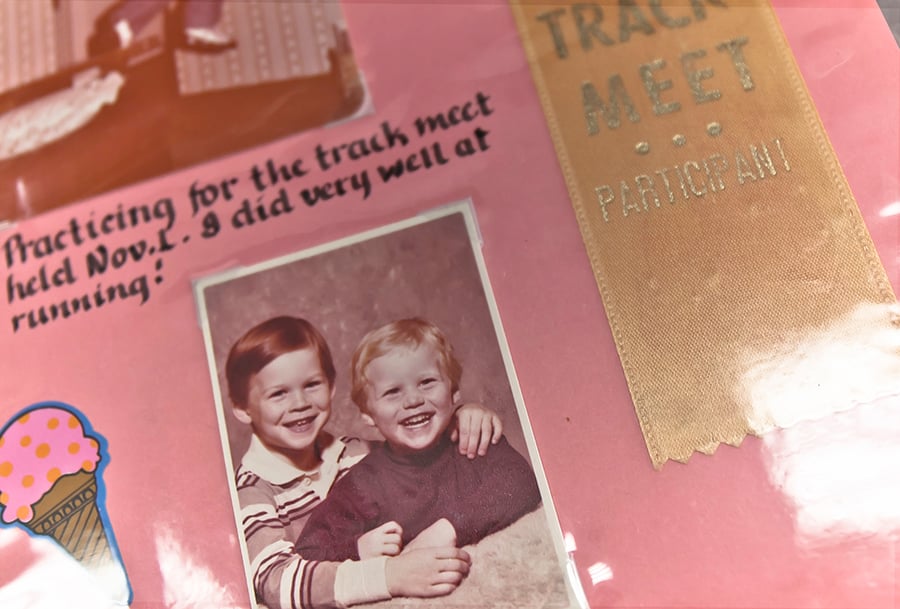
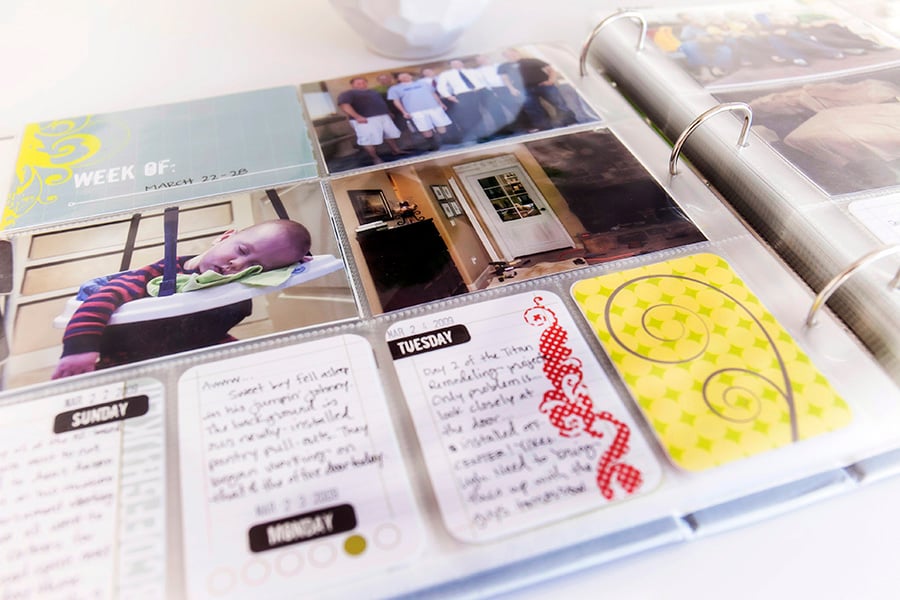
Pocket-Page Scrapbooking
Then, in January 2008, Creating Keepsakes Magazine launched a kit called Project 365 as part of their "kit of the month" program. Creating Keepsakes Creative Editor Becky Higgins designed the kit as a “photo a day” album, and it featured page protectors with individual pockets to insert photos and decorative cards. Few could imagine, at the time, that this simple kit would be the genesis of another major shift for scrapbooking.
One of Becky Higgins' original Project 365 albums showcasing pocket-page scrapbooking.
Pocket-page protectors had been available to scrapbookers for quite
some time, but it wasn’t until the Project 365 kit that pocket-page
scrapbooking received wide-spread adoption and captured the imagination
of scrapbookers around the world. Pocket-page scrapbooking challenged
the very definition of a scrapbook as photos on a blank page and
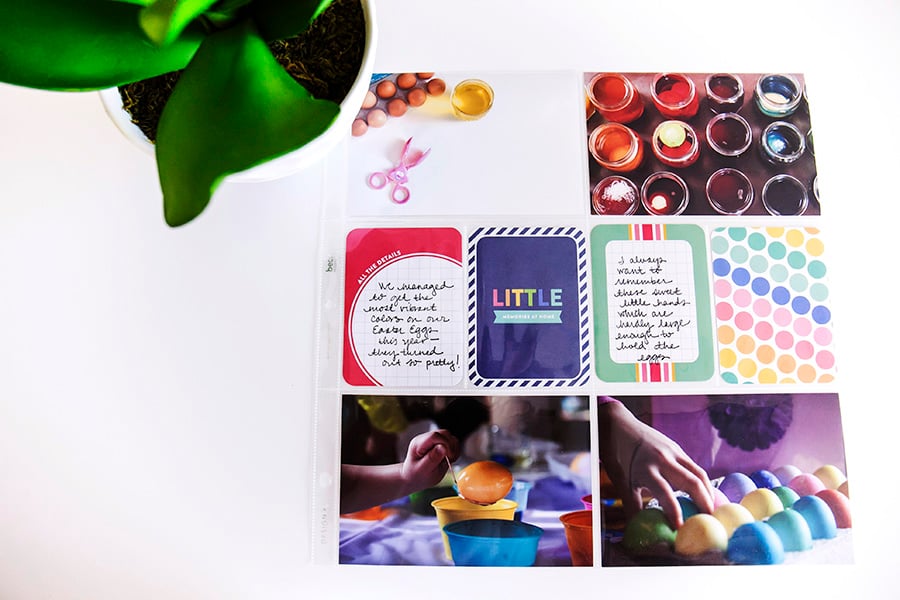
scrapbooking expanded to include putting things in pockets.In late 2009, Becky Higgins left Creating Keepsakes and launched her own company to introduce the Project Life system. Project Life followed in the footsteps of Project 365 by offering kits of decorative cards that could be placed alongside photos in pocket-style plastic protectors. For scrapbookers, Project Life helped answer the question of what to do with all of the new “everyday life” photos they were accumulating. It also simplified the scrapbooking process and lowered the barrier to entry for new scrapbookers. Project Life appealed to those who may have felt overwhelmed by scrapbooking and also became an entry point for people who had never scrapbooked before.
A more recent Project Life pocket-style page created by a Project Life customer.
Note: The rise of pocket scrapbooking did not replace 12” x 12" scrapbook pages. Pocket cards now reside side by side with more traditional 12” x 12” pages as staples in many companies’ scrapbook lines – and in scrapbookers’ supply cabinets and albums. Many scrapbookers utilize both types of pages, sometimes even in the same album, to meet their needs for a particular project.
Note: If you are interested in pocket-page scrapbooking you can take our free video class and learn more here.
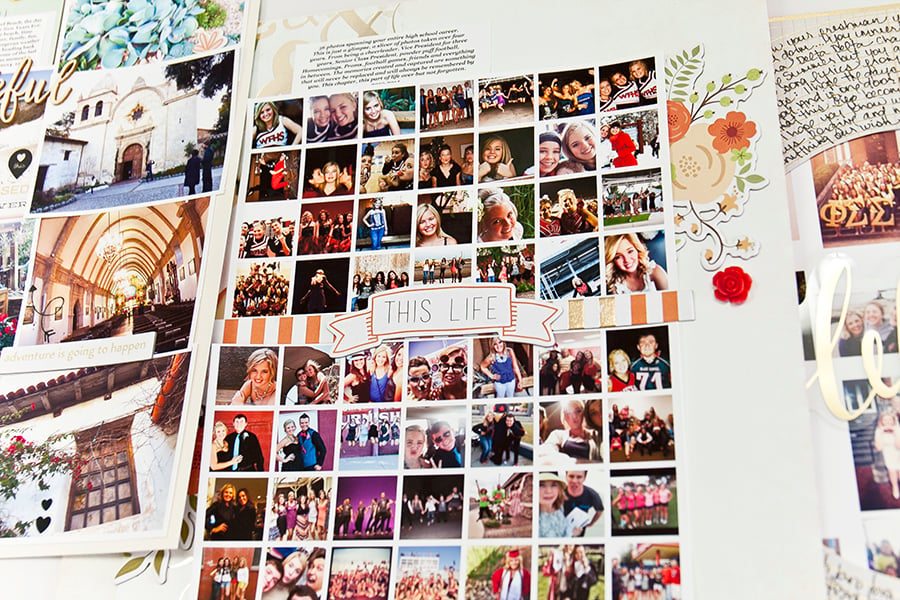
Social Media and Photography
Recent layouts from renowned scrapbooker Dedra Long showcasing square Instagram style photos.
As the camera phone has come to dominate personal photography,
photography trends from social media are finding their way into
scrapbooks. The most prominent has been the influence of Instagram.
Where once photography (and thus by extension, the scrapbook) was prized
for its realism, now, scrapbooks are being filled with photos that have
been stylized with filters that create artistic effects. Instagram,
which initially only allowed square photos, also led to an influx of
scrapbooking products created for the square photo.Modern Planners, Journals and Recordkeeping
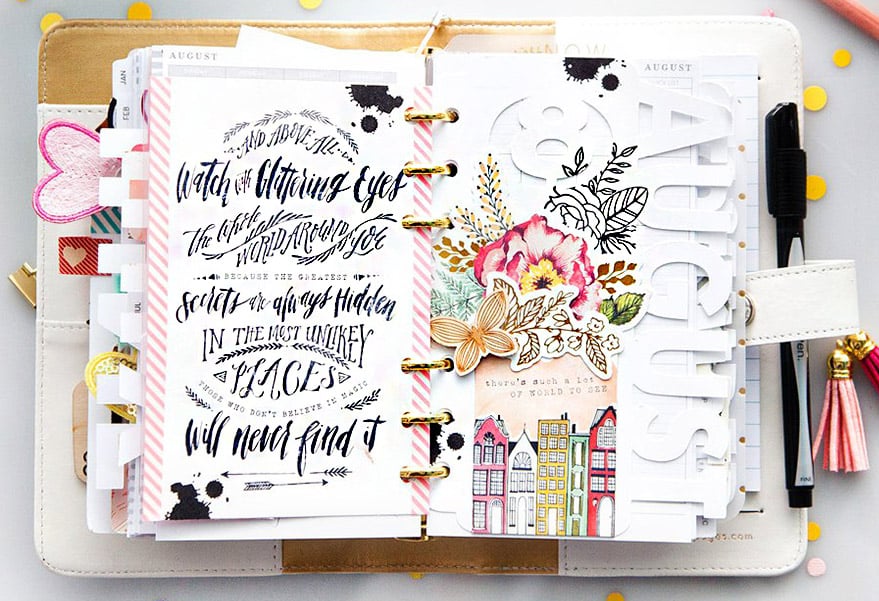
Proving that old ideas can be new again, the newest form of scrapbooking has roots in one of the oldest. Many scrapbookers are reinventing traditional weekly day planners as embellished daily journals and personal records. These planners are reminiscent of the centuries-old tradition of the commonplace book – an assemblage of notes and information from a person’s life. In the modern incarnation, planner enthusiasts are adding photos, stamps, stickers, and other embellishments to their handwritten notes to create a result that is both decorative and also a historic document.
A modern planner used for calendaring, record-keeping and journaling.
Bible journaling has also exploded in popularity in recent
years. In fact, like Granger's old Kitto Bible, modern Journal Bibles
are created with blank space in the margins for illustrations, stickers
and journaling. Many scrapbookers will record their thoughts in the
margin of their bible and personalize them. These bibles act as
inspiring faith-journals and are given as keepsakes for future
generations.
An 1800s
bible that was used for family record keeping (top) contrasted with a
modern bible used for journaling and documentation today (bottom).
An antique bible used for family record-keeping and documentation compared to a modern day Bible with bible journaling
Today's Scrapbooks
Modern scrapbook layout by Dedra Long.
Today's modern scrapbook layouts combine handwritten entries (like
those in commonplace books) with doodles (like those in grangerized
ones). They contain professional portraits (like those of the 1800s)
with casual photographs (like those popularized in the early 1900s). The
modern-day scrapbook is the culmination of its history.While the technology and techniques may have changed over the centuries, one thing has remained the same – the human urge to record our history and tell our stories. Whether you call it a commonplace book, a grangerized book, a photo album or a scrapbook, one thing is for certain - scrapbooking leaves a legacy for future generations through beautiful, meaningful, handmade self-expression.
A modern scrapbook page created by
Dedra Long. This page combines several elements including journaling,
titles, decorative 3-D memorabilia and color photos.
Friday, February 9, 2018
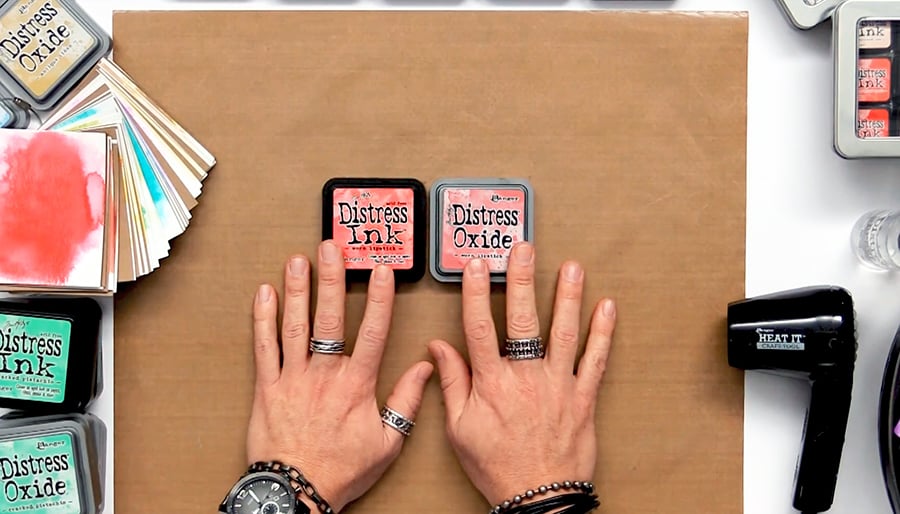
Distress Ink versus Distress Oxide Ink.
Here is some great information I found on Scrapbook.com regarding Distress Inks and Distress Oxide Inks. You will definitely need a cup of coffee and some time to ready this.
 The
first distinct difference is one of formula. Distress Inks fall into
the family of dye inks. Dye inks are transparent in nature and, due to
their "thin" quality, dry quickly. Distress Oxides, on the other hand,
are primarily constructed of pigment ink, a type of ink that is opaque
and, due to its natural thickness, dries more slowly. It is important to
note, however, that Distress Oxides are technically a hybrid -
containing mostly pigment ink, but also some dye ink too. This is the
first key difference between the two inks. Learn more about the
differences between dye, pigment, and other inks in our guide here.
The
first distinct difference is one of formula. Distress Inks fall into
the family of dye inks. Dye inks are transparent in nature and, due to
their "thin" quality, dry quickly. Distress Oxides, on the other hand,
are primarily constructed of pigment ink, a type of ink that is opaque
and, due to its natural thickness, dries more slowly. It is important to
note, however, that Distress Oxides are technically a hybrid -
containing mostly pigment ink, but also some dye ink too. This is the
first key difference between the two inks. Learn more about the
differences between dye, pigment, and other inks in our guide here.
Both types of inks can be essential to a card maker's repertoire, depending on his or her goals. For quick projects, a dye ink might be what you need. For projects that can stand to have a little more dry time, you may prefer pigment ink. It's entirely up to you!
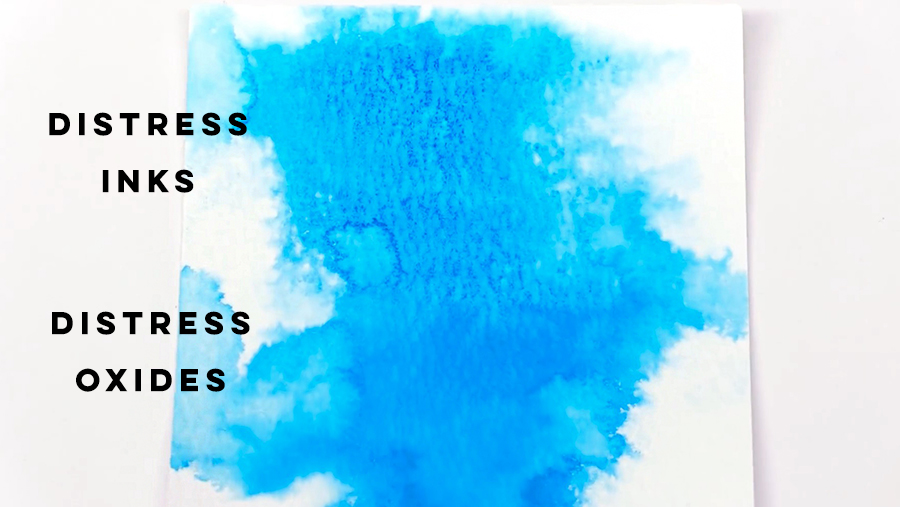
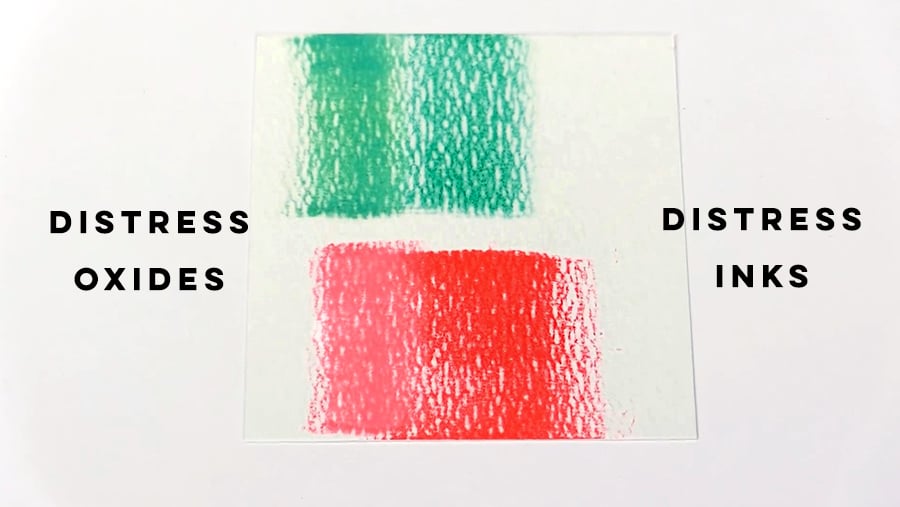 On
a clean, white piece of watercolor paper or cardstock, Distress Inks
and Distress Oxides do not appear all that different, but once you get
elbow deep into the nitty-gritty of your creative exploits, you will
soon begin to discover otherwise.
On
a clean, white piece of watercolor paper or cardstock, Distress Inks
and Distress Oxides do not appear all that different, but once you get
elbow deep into the nitty-gritty of your creative exploits, you will
soon begin to discover otherwise.
Distress Oxides begin to oxidize immediately, giving them a chalky finished look, even though they contain absolutely no chalk. Because of this milky oxidizing effect and the fact that they are pigment inks, which makes them more opaque, they tend to "cover up" their background (i.e. the white cardstock). This makes the Distress Inks appear brighter and more vibrant in color when used on a white piece of cardstock. This is something to consider when you choose which ink you might want to uncap for your next project.
 The
difference between Distress Inks and Distress Oxides is much more
obvious on a darker background. Be it Kraft, black cardstock, or
otherwise, you'll notice that the same thing happens: the Distress Oxide
(pigment-based) "covers up" the background and the Distress Ink
(dye-based) allows the background color to seep through. In cases of
dark backgrounds, you may find that you prefer the brightness that the
Distress Oxide delivers.
The
difference between Distress Inks and Distress Oxides is much more
obvious on a darker background. Be it Kraft, black cardstock, or
otherwise, you'll notice that the same thing happens: the Distress Oxide
(pigment-based) "covers up" the background and the Distress Ink
(dye-based) allows the background color to seep through. In cases of
dark backgrounds, you may find that you prefer the brightness that the
Distress Oxide delivers.
 You may notice that Distress Inks come in this cute mini variety - 1" x 1". Distress Oxides do not currently come in this tiny size.
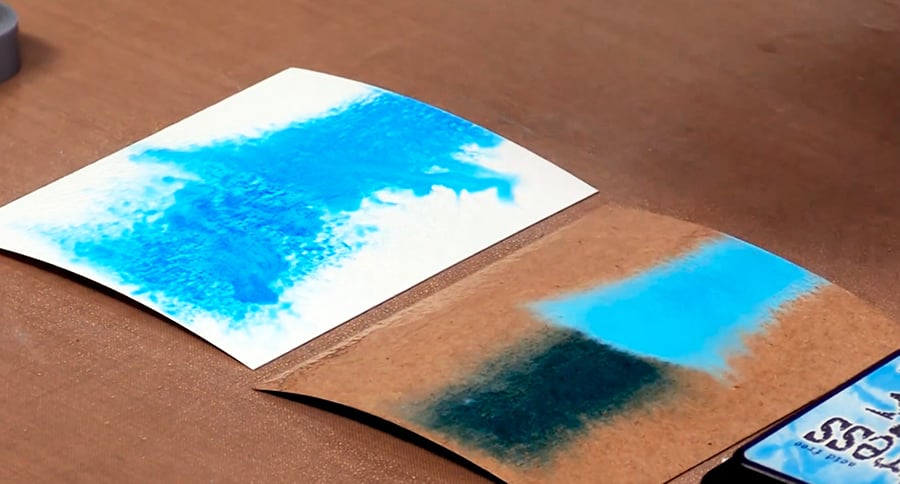
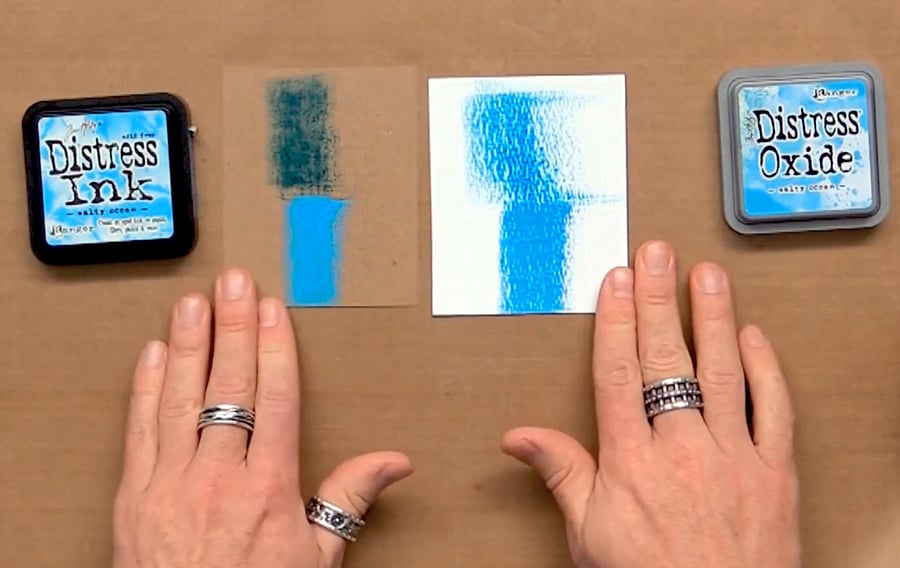 Here,
we see two examples of Distress Inks and Oxides, on a dark background,
then on a light. On the left, we have Distress Ink on the top half of
our kraft paper and Distress Oxide on the bottom. The same on the right -
Distress Ink on top, Distress Oxide on the bottom.
Here,
we see two examples of Distress Inks and Oxides, on a dark background,
then on a light. On the left, we have Distress Ink on the top half of
our kraft paper and Distress Oxide on the bottom. The same on the right -
Distress Ink on top, Distress Oxide on the bottom.
Both Distress Inks and Distress Oxides work harmoniously with water, creating visually stunning results. Using a sprayer is a quick and easy way to make impressive backgrounds and delicious designs.
 Fill up your craft water bottle and spray to your heart's content. You'll notice a difference in the effects you get right away.
 Both
Distress Inks and Distress Oxides wick with water (they spread and
travel across the surface of the paper, creating galactic effects). They
also both can air dry or be dried via use of a heat tool.
Both
Distress Inks and Distress Oxides wick with water (they spread and
travel across the surface of the paper, creating galactic effects). They
also both can air dry or be dried via use of a heat tool.
Distress Inks maintain their transparent constitution, allowing you to "see through them" all the way to the tooth (the texture) of the watercolor paper behind.
Distress Oxides also do not cease to keep their disposition. Covering the paper more opaquely, you see layers of ink, versus directly through to the back of the paper.
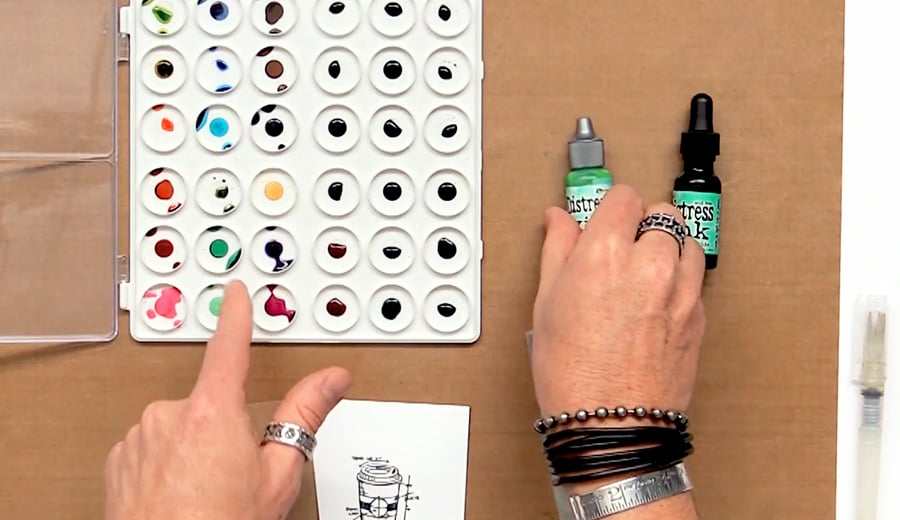
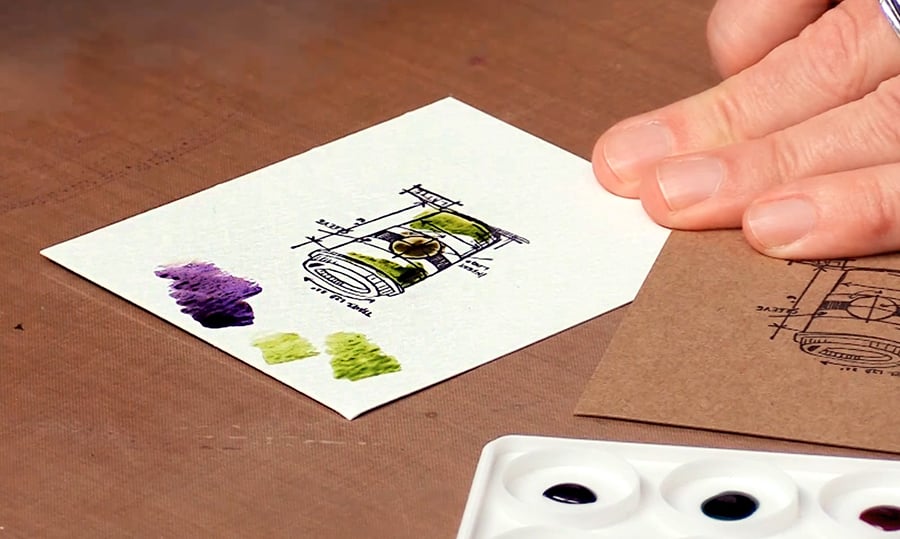
For watercoloring with both Distress options, using Distress Ink and Oxide Reinker bottles is the easiest option. Use a palette to store your Distress Ink and Distress Oxide drops - one drop per place setting should suffice. Because the medium is ink, you do not have to worry about it drying up in its liquid form. If you don't use all of a color, that's totally okay. You'll have the ink ready to use for the next time you get creative!
On the left half of the pictured palette above, each place setting holds one drop of Distress Oxide Reinker. On the right hand side, each place setting holds one drop of Distress Ink. Notice that it's easier to see the hue of the Oxides, so it may serve you well to label your color spots if you're using Distress Inks.
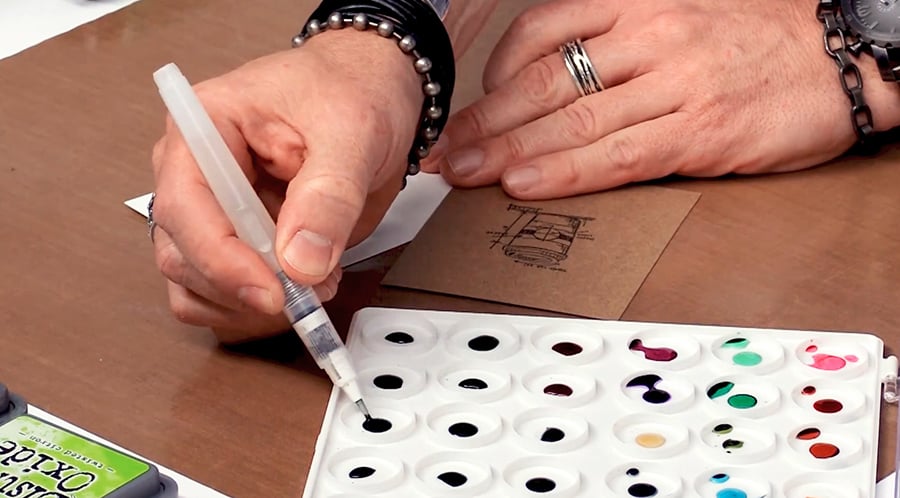 Grab your favorite water brush
(or a watercolor brush and cup of water). Both Distress Inks and Oxides
are utilized as watercoloring mediums in the same exact way, but will
have different effects.
Grab your favorite water brush
(or a watercolor brush and cup of water). Both Distress Inks and Oxides
are utilized as watercoloring mediums in the same exact way, but will
have different effects.
 Watercoloring
with Distress Inks will give you a more traditional watercolor effect -
a transparent, watery look that becomes lighter hued with more water
and more saturated with more "paint" - or in this case, Distress Ink
Reinker, such as in the image above.
Watercoloring
with Distress Inks will give you a more traditional watercolor effect -
a transparent, watery look that becomes lighter hued with more water
and more saturated with more "paint" - or in this case, Distress Ink
Reinker, such as in the image above.
You'll find, just like in the initial ink comparison, that using the Distress Ink Reinker creates vibrant color when used on a stark white piece of watercolor paper or heavy lb cardstock, but creates a much less saturated result when using dark or kraft paper - just as standard watercolor paint would do.
 However,
on the contrary, Distress Oxide Reinkers will create a much more opaque
effect on your dark backgrounds (and your white ones too, though the
color might not be quite as bright as Distress Ink on a white
background). Utilizing Distress Oxides in this way will create a
finished product that looks a lot more like a heavier bodied paint and
the ink will begin to oxidize immediately, creating the wow-effect that
these Distress Oxides so steadfastly provide.
However,
on the contrary, Distress Oxide Reinkers will create a much more opaque
effect on your dark backgrounds (and your white ones too, though the
color might not be quite as bright as Distress Ink on a white
background). Utilizing Distress Oxides in this way will create a
finished product that looks a lot more like a heavier bodied paint and
the ink will begin to oxidize immediately, creating the wow-effect that
these Distress Oxides so steadfastly provide.
Both Distress Inks and Distress Oxides can be mixed and matched when watercoloring too, which gives you, the artist, more flexibility, creative power, and options!
 With
the milky shamrock green of the Oxide variety and the black coffee
transparency of the Ink, the differences in how the colors appear gives
you the option to create unique blends of the two until the cows come
home!
With
the milky shamrock green of the Oxide variety and the black coffee
transparency of the Ink, the differences in how the colors appear gives
you the option to create unique blends of the two until the cows come
home!
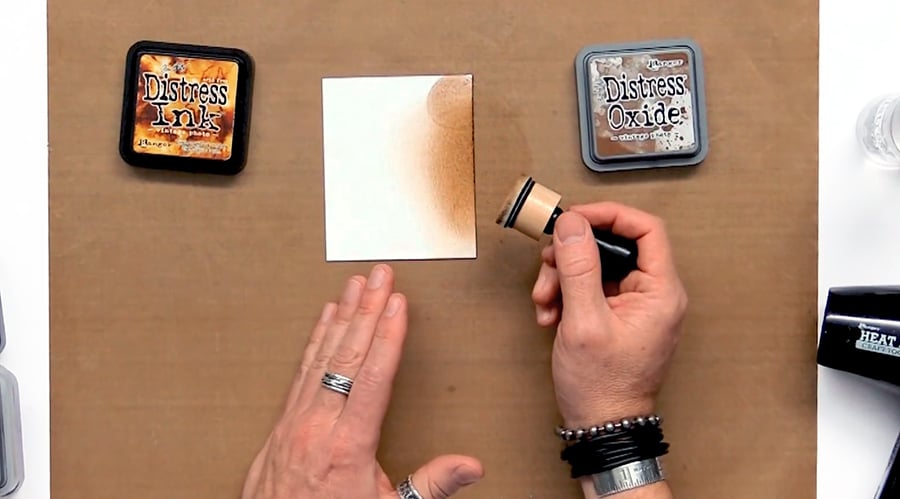 The tale as old as time, the search of generations, one might even argue the discovery is the joie de la vivre: how do you get the perfect blend with stamping ink? First of all, having the right tool is the smallest, easiest, yet most fundamental step in creating impressive, cotton-candy blended backgrounds. Either a Blending Tool with interchangeable pads or a reusable Dauber Set will get the job done and you'll be glad you invested in one.
Once you have the perfect blending tool, you need the perfect ink. Lucky for crafters everywhere, both Distress Inks and Distress Oxides blend well, but one may champion the other.
Distress Inks, due to their transparency (you may be noticing a theme), have a tendency to show streaks more than their counterpart. This does not mean that you cannot blend with them or that it is even difficult to blend with them. This does mean, however, that you may need to practice a bit more lightness of hand with them, being careful not to press down too hard in one spot, as once a streak makes the scene, you'll notice they take a little patience and TLC to smear back out.
One of the most fascinating and beloved characteristics of Distress Oxides is its ability to easily blend, nearly flawlessly. Drop your blending tool and make a smear? It's fine. Breathe easily and rest assured that a little pushing and pulling of the oxide will blur your accidental streak into oblivion.
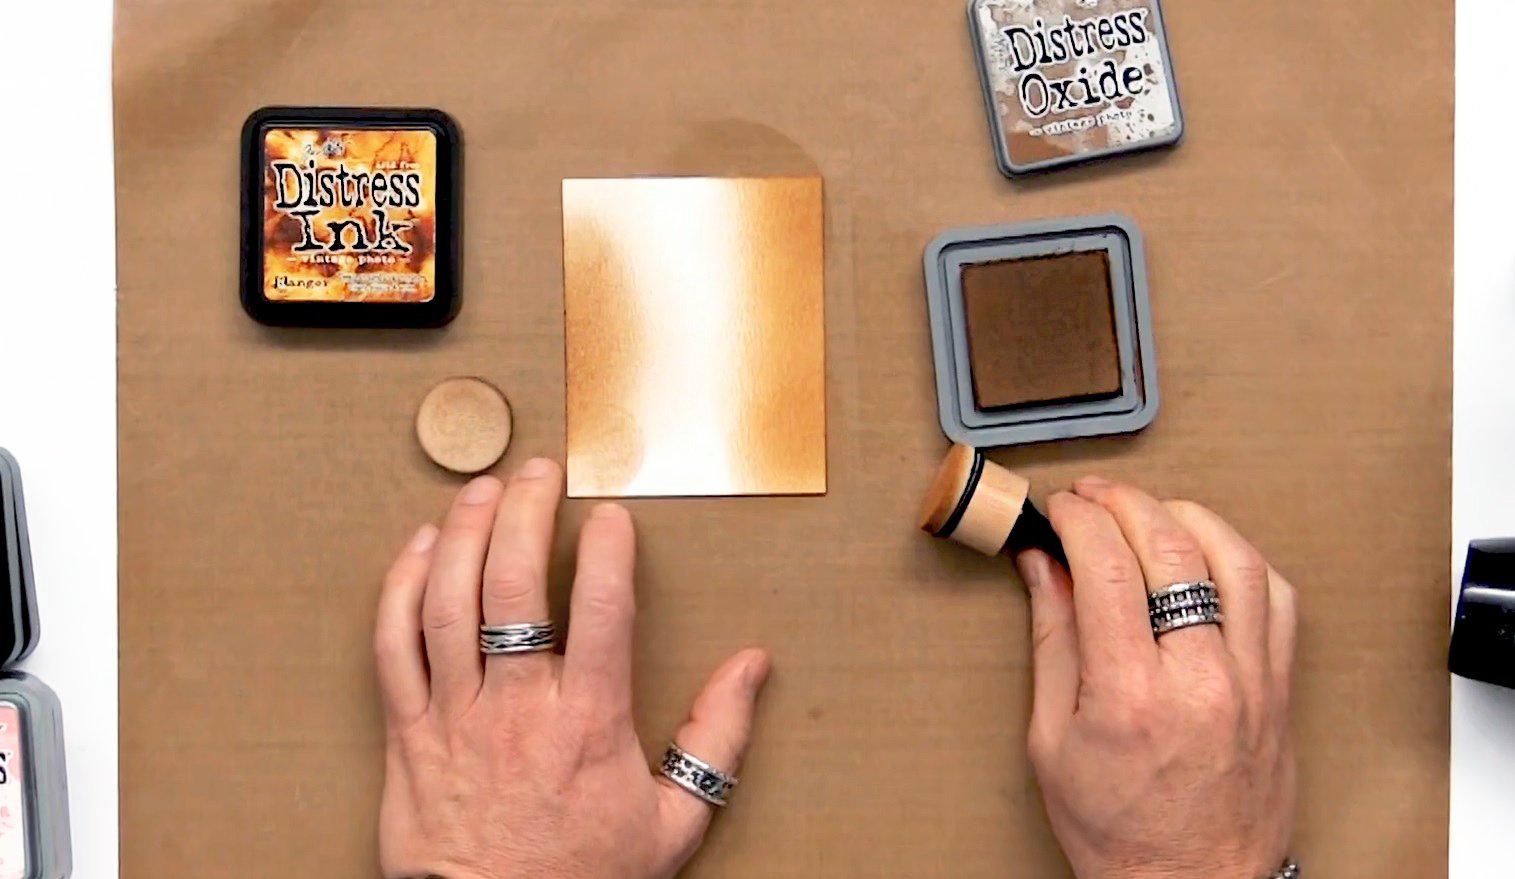
On the left, you can see the edge blended using Distress Ink, versus the right side, blended with Distress Oxide. The Distress Ink creates an edge that looks more antique and "gritty." The Distress Oxide looks creamier. The effect you want is up to you. If you prefer one over the other, there is no right or wrong answer. You may even prefer both at different times!
 Both
Distress Inks and Distress Oxides can be used for embossing. Because
the ink pad color will be the color of your end embossed result, Tim
Holtz (the creative mind behind Ranger Ink's Distress products)
recommends using a clear embossing powder so you can see the beautiful, rainbow hues.
Both
Distress Inks and Distress Oxides can be used for embossing. Because
the ink pad color will be the color of your end embossed result, Tim
Holtz (the creative mind behind Ranger Ink's Distress products)
recommends using a clear embossing powder so you can see the beautiful, rainbow hues.
I really hope you enjoyed this article.
Until Next Time
Kerry
The
first distinct difference is one of formula. Distress Inks fall into
the family of dye inks. Dye inks are transparent in nature and, due to
their "thin" quality, dry quickly. Distress Oxides, on the other hand,
are primarily constructed of pigment ink, a type of ink that is opaque
and, due to its natural thickness, dries more slowly. It is important to
note, however, that Distress Oxides are technically a hybrid -
containing mostly pigment ink, but also some dye ink too. This is the
first key difference between the two inks. Learn more about the
differences between dye, pigment, and other inks in our guide here.Both types of inks can be essential to a card maker's repertoire, depending on his or her goals. For quick projects, a dye ink might be what you need. For projects that can stand to have a little more dry time, you may prefer pigment ink. It's entirely up to you!
On
a clean, white piece of watercolor paper or cardstock, Distress Inks
and Distress Oxides do not appear all that different, but once you get
elbow deep into the nitty-gritty of your creative exploits, you will
soon begin to discover otherwise.Distress Oxides begin to oxidize immediately, giving them a chalky finished look, even though they contain absolutely no chalk. Because of this milky oxidizing effect and the fact that they are pigment inks, which makes them more opaque, they tend to "cover up" their background (i.e. the white cardstock). This makes the Distress Inks appear brighter and more vibrant in color when used on a white piece of cardstock. This is something to consider when you choose which ink you might want to uncap for your next project.
The
difference between Distress Inks and Distress Oxides is much more
obvious on a darker background. Be it Kraft, black cardstock, or
otherwise, you'll notice that the same thing happens: the Distress Oxide
(pigment-based) "covers up" the background and the Distress Ink
(dye-based) allows the background color to seep through. In cases of
dark backgrounds, you may find that you prefer the brightness that the
Distress Oxide delivers.You may notice that Distress Inks come in this cute mini variety - 1" x 1". Distress Oxides do not currently come in this tiny size.How do You Use Water With Distress Inks and Oxides?
Here,
we see two examples of Distress Inks and Oxides, on a dark background,
then on a light. On the left, we have Distress Ink on the top half of
our kraft paper and Distress Oxide on the bottom. The same on the right -
Distress Ink on top, Distress Oxide on the bottom.Both Distress Inks and Distress Oxides work harmoniously with water, creating visually stunning results. Using a sprayer is a quick and easy way to make impressive backgrounds and delicious designs.
Fill up your craft water bottle and spray to your heart's content. You'll notice a difference in the effects you get right away.Tip: Test papers. If adding water "doesn't work", it may be an issue of paper type! Some papers are more porous than others, making the aftermath of your water adventures not be quite what you had envisioned. You have two options here: GO WITH IT! Or, try different papers! Notice in the image above: the white paper allowed the Distress Inks and Oxides to travel, whereas the kraft paper held a "you shall not pass" mentality.Is there a difference between Distress Inks and Distress Oxides when used with water? Yes!
Both
Distress Inks and Distress Oxides wick with water (they spread and
travel across the surface of the paper, creating galactic effects). They
also both can air dry or be dried via use of a heat tool.Distress Inks maintain their transparent constitution, allowing you to "see through them" all the way to the tooth (the texture) of the watercolor paper behind.
Distress Oxides also do not cease to keep their disposition. Covering the paper more opaquely, you see layers of ink, versus directly through to the back of the paper.
Can You Watercolor with Distress Inks and Distress Oxides?
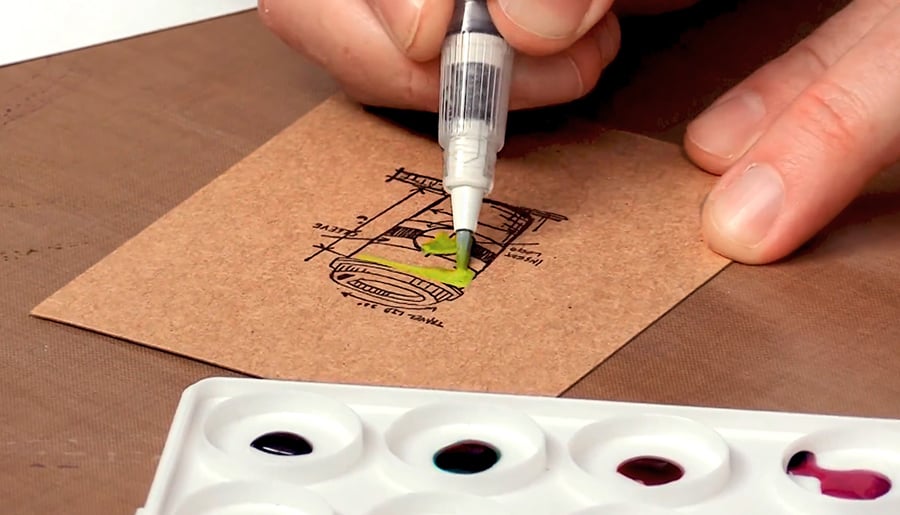
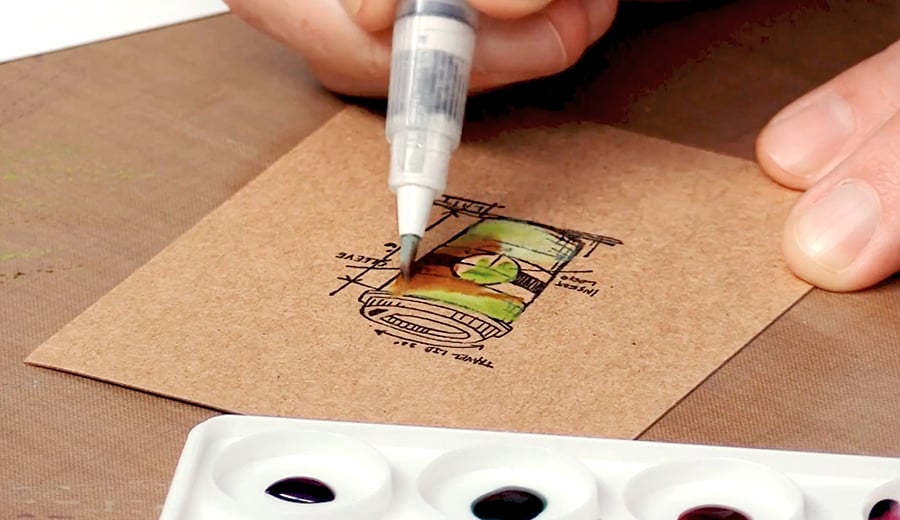
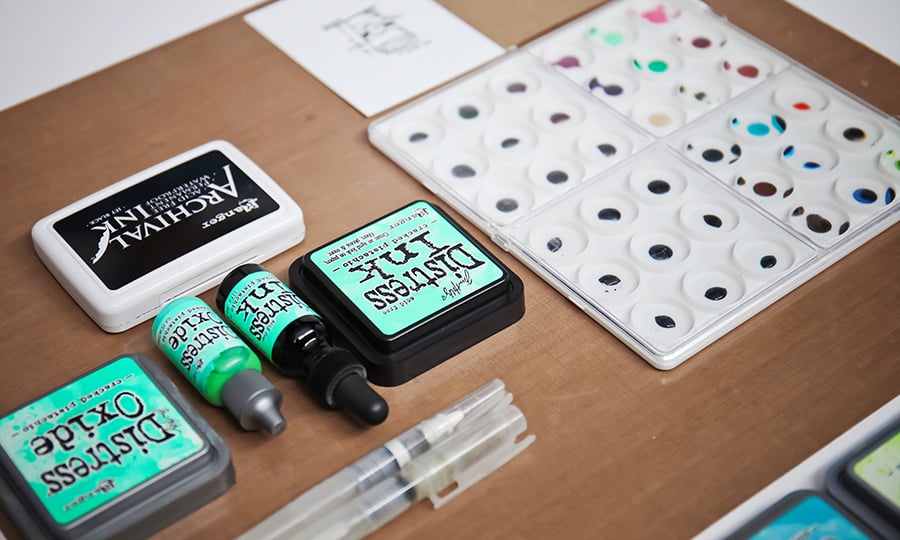
Yes! Because both Distress Inks and Oxides respond well to water, watercoloring with a brush is a wonderful way to use both of these inks, and you'll get varying results with both.For watercoloring with both Distress options, using Distress Ink and Oxide Reinker bottles is the easiest option. Use a palette to store your Distress Ink and Distress Oxide drops - one drop per place setting should suffice. Because the medium is ink, you do not have to worry about it drying up in its liquid form. If you don't use all of a color, that's totally okay. You'll have the ink ready to use for the next time you get creative!
On the left half of the pictured palette above, each place setting holds one drop of Distress Oxide Reinker. On the right hand side, each place setting holds one drop of Distress Ink. Notice that it's easier to see the hue of the Oxides, so it may serve you well to label your color spots if you're using Distress Inks.
Tip: Because Distress Oxides are thicker than Distress Inks, make sure you shake your Oxide Reinker (with the cap secured) before dropping it onto your palette to make sure the pigment ink fusion is cohesively blended.
Grab your favorite water brush
(or a watercolor brush and cup of water). Both Distress Inks and Oxides
are utilized as watercoloring mediums in the same exact way, but will
have different effects.Watercoloring
with Distress Inks will give you a more traditional watercolor effect -
a transparent, watery look that becomes lighter hued with more water
and more saturated with more "paint" - or in this case, Distress Ink
Reinker, such as in the image above.You'll find, just like in the initial ink comparison, that using the Distress Ink Reinker creates vibrant color when used on a stark white piece of watercolor paper or heavy lb cardstock, but creates a much less saturated result when using dark or kraft paper - just as standard watercolor paint would do.
However,
on the contrary, Distress Oxide Reinkers will create a much more opaque
effect on your dark backgrounds (and your white ones too, though the
color might not be quite as bright as Distress Ink on a white
background). Utilizing Distress Oxides in this way will create a
finished product that looks a lot more like a heavier bodied paint and
the ink will begin to oxidize immediately, creating the wow-effect that
these Distress Oxides so steadfastly provide.Both Distress Inks and Distress Oxides can be mixed and matched when watercoloring too, which gives you, the artist, more flexibility, creative power, and options!
With
the milky shamrock green of the Oxide variety and the black coffee
transparency of the Ink, the differences in how the colors appear gives
you the option to create unique blends of the two until the cows come
home!Tip: Both Distress Inks and Distress Oxides pads can be reinked via the Distress Ink and Oxide Reinkers. Once each pad starts to dry out, simply drop your reinker onto your dehydrated felt pad and watch it come back to life.
How do you Watercolor with distress inks and oxides?
- Drop your favorite Reinker colors in a clean paint palette
- Prep your waterbrush by filling it with water and gently squeezing to ensure its functioning
- Dip your brush into your ink
- Test your colors on a scrap piece of paper to test them before adding them to your project
- Paint as you normally would and add paint/squeeze water as needed
- When finished, allow your project to air dry or use a heat tool to dry
Which Ink Blends Better?
The tale as old as time, the search of generations, one might even argue the discovery is the joie de la vivre: how do you get the perfect blend with stamping ink? First of all, having the right tool is the smallest, easiest, yet most fundamental step in creating impressive, cotton-candy blended backgrounds. Either a Blending Tool with interchangeable pads or a reusable Dauber Set will get the job done and you'll be glad you invested in one.Once you have the perfect blending tool, you need the perfect ink. Lucky for crafters everywhere, both Distress Inks and Distress Oxides blend well, but one may champion the other.
Distress Inks, due to their transparency (you may be noticing a theme), have a tendency to show streaks more than their counterpart. This does not mean that you cannot blend with them or that it is even difficult to blend with them. This does mean, however, that you may need to practice a bit more lightness of hand with them, being careful not to press down too hard in one spot, as once a streak makes the scene, you'll notice they take a little patience and TLC to smear back out.
One of the most fascinating and beloved characteristics of Distress Oxides is its ability to easily blend, nearly flawlessly. Drop your blending tool and make a smear? It's fine. Breathe easily and rest assured that a little pushing and pulling of the oxide will blur your accidental streak into oblivion.
On the left, you can see the edge blended using Distress Ink, versus the right side, blended with Distress Oxide. The Distress Ink creates an edge that looks more antique and "gritty." The Distress Oxide looks creamier. The effect you want is up to you. If you prefer one over the other, there is no right or wrong answer. You may even prefer both at different times!
Can You Emboss with Distress Inks and Distress Oxides?
Both
Distress Inks and Distress Oxides can be used for embossing. Because
the ink pad color will be the color of your end embossed result, Tim
Holtz (the creative mind behind Ranger Ink's Distress products)
recommends using a clear embossing powder so you can see the beautiful, rainbow hues.How do you emboss with Distress Ink or Oxide?
- Emboss as you normally would - coat your stamp with a generous amount of Distress Ink or Oxide
- Stamp your image onto your paper
- Set your stamped paper atop a piece of scratch paper
- Cover your stamped image with a layer of embossing powder. Make sure your entire image is covered in powder
- Pick up your newly coated stamped image and gently tap excess powder off
- Put extra loose embossing powder back into its container and screw on the top cap
- Holding your paper up by the corner, heat cure it with an embossing heat tool or craft heat tool. Get very close to your image and avoid your fingers. It's very hot.
- You'll notice your impression start to change color and texture. When it does, move the heat to a different part of your image.
The Differences Between Distress Inks and Distress Oxides Recap
- Distress Inks are Dye Inks
- Distress Oxides are Pigment-Dye fusions
- Distress Inks are more transparent
- Distress Oxides are more opaque
- Both Distress Inks and Oxides are available in the standard 3" x 3" size
- Only Distress Inks are available in 1" x 1" minis
- Distress Inks are brighter in color than Distress Oxides when used on white cardstock
- Distress Oxides are brighter in color than Distress Inks when used on kraft or dark cardstock
- Distress Inks dry faster than Distress Oxides
- Both Distress Inks and Distress Oxides can be used for watercoloring
- Distress Inks and Distress Oxides pads can both be reinked
- Distress Inks blend a little bit streakier than Distress Oxides
- Distress Oxides have a creamier result from blending
- Both Distress Inks and Distress Oxides can be used for embossing
I really hope you enjoyed this article.
Until Next Time
Kerry
Thursday, February 8, 2018
Waiting
Hello Everyone,
This is my page Waiting using the lovely new paper from the Happy Hello Range - Speckled Posies. This paper was made for this beautiful photo. I have backed the Speckled Posies paper onto White Cardstock and then onto Stone Cardstock. On my layout I have used the new embellishments Feathers, Paper Flowers, Chipboard Hearts, Natural Twine, Rhinestones and of course something I love to put onto my layouts Cheesecloth. The flowers have been inked in Dylusions Paint - Melted Chocolate and the Cheesecloth coloured with Distress Oxide Ink - Worn Lipstick. The Chipboard Hearts and the word Beautiful, I used Sticky Embossing Powder, Bronze Foil and Perfect Medium.

I hope you enjoy my page.
Until Next Time
Kerry
Wednesday, February 7, 2018
African Safari Art Journal Page Created by Rosemary Clive
If you are into Art Journaling here is a beautiful design by Rosemary Clive.
There is always something new at Kaszazz - make yourself a coffee and CLICK HERE
to view a slideshow of the full collection of 2Hr Workshop Projects!!!!
I hope you enjoy the Slideshow you will see many beautiful designs........
Until Next Time
Kerry

Tuesday, February 6, 2018
Portraits Of The Past
Hello Everyone,
Well here is my completed page. On the weekend I posted how I design a page. I am really happy with the outcome. I have been doing my Family History for a long time now, and love to look at all the old photos I am so lucky to have. This one is of my Grandmother and her brother. Just love them, the look on her face gives me the impression she did not want her photo taken. The fence in the background was inspired by Pinterest.

Until Next Time
Kerry
Saturday, February 3, 2018
How I Design a Scrapbook Page
Today I thought I would show you how I design a page. I have been lucky enough to have four of my designs published in a Scrapbook Magazine. It has been two years now since I have designed anything to be published, but this year will once again try and get my pages published. Although this design I am showing you today I can not take full credit for. The Fence at the back of the photo was Inspired by Pinterest.
- Make a rough design on a piece paper of a page I think I would like.
- Pick out the photo I want to scrap. Decide if I want it Coloured or Black and White
- Pick the papers to match my photo. Sometimes this can take some time but I believe you must have the right colours for your photo. I can spend up to 2 hours trying to get the right colours. Cut the paper and cardstock to the measurements I require. Distress the edges and Ink them if this is the technique you are looking for.
- Then on my Scrapbooking Mat I start to assemble the page. Piece by piece. Starting with the background and working forwards. Placing the pieces of paper where I think they would look good.
- Once I have the background done and the photo placed on my layout. I decide what embellishments I would like on the page and where I am going to place. Embelllishments must also be right for my photo. If am making flowers etc. I make them and ink them to the colour required before I place on my page. Do any fine tuning to any embellishments I am using.
- I keep a Plastic container next to me where I place everything I have used on the layout. When my layout is finished I return all the products back to their places.
Note: Many times my page does not look like the rough design I started off with.
 |
| Layout ready to be assembled. |
 |
| My Plastic Container with all products used on the page. |
My page has a lot of work to be done to it yet a lot of fine tuning, as when I look at it there is a lot more inking and distressing I need to do. I will post a photo of the page when it is finished.
Hope this helps you with designing your own scrapbooking pages. It is a lot of fun.
Until Next Time
Kerry
Friday, February 2, 2018
Kaszazz Embossing Folders
Hope you enjoy this video.
Subscribe to:
Posts
(Atom)


Grab my button!


-
This article is from Scrapbook.com The Birth of Modern Scrapbooking If you had to pinpoint exactly where today's form of scrapbook...
-
Demonstration of a reverse embossed technique, using the Bellish! Ezy Press Roller Die Cutting and Embossing Machine, Swinging Flowers ...
-
 Hello Everyone, Today I am going to talk about Flower Paper Punches. Kaszazz sells three different types of Flower Paper Punches - These pu...
 -
 Hello Everyone, I am back on the blog today sharing these two beautiful pages. My Scrapbooking classes are taking off and today I have two...
 -
FREE Project Sheet Downloads! Follow our project sheets with full instructions to Create It Yourself (CIY). LIMITED TIME Stamp Value Bund...
-
 Good Morning Everyone, Yes this is a photo taken of me when I was a baby in 1955 and oh how time flies. This page is scrapped using the be...
 -
 Hi Everyone, Well we are in stage 2 restrictions here in Townsville with Covid knocking on our doorsteps, so today I decided to show you a ...


